|
|
Вязаные вещи
| |
| Majesty | Дата: Четверг, 22.03.2012, 19:00 | Сообщение # 1 |
 Королева
Группа: Пользователи
Сообщений: 564
Статус: Offline
| 
Majesty
|
| |
| |
| Majesty | Дата: Четверг, 22.03.2012, 19:03 | Сообщение # 2 |
|
Королева
Группа: Пользователи
Сообщений: 564
Статус: Offline
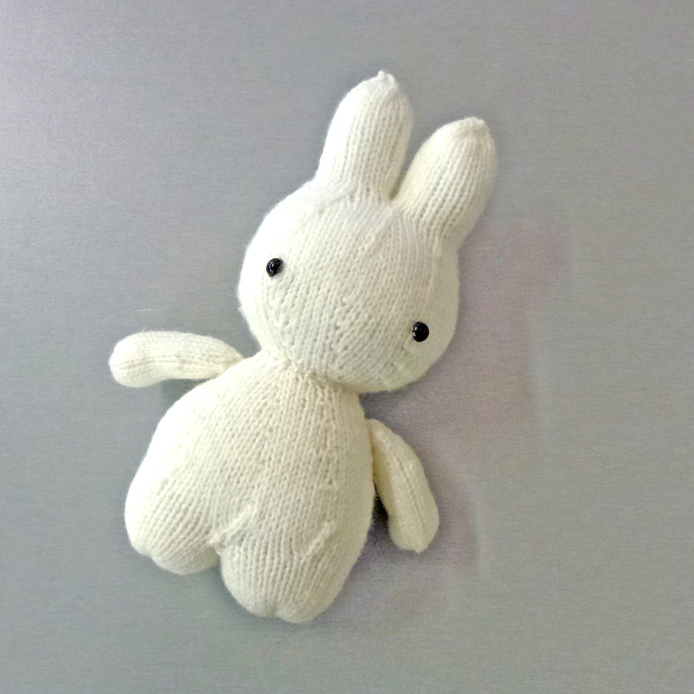
| Miffy and her balloon plush toy pattern
My latest creation, my favorite bunny in the world...Miffy. She is dedicated to my pet rabbit Nosy.
As this is a free pattern, pattern is for personal use only and may not be sold, photocopied or copied electronically or distributed in any way. Please don't sell the toy you've made, and please provide credit for the design of the pattern to myself (Knitterbees).
Note: balloon to be put up soon, trying to find a black stick at the moment...
Materials:
1. 8 ply weight wool or acrylic.
2. 3.25mm 40cm circular needles/ 3.25 DPN or size needed to obtain gauge.
3. 3.75mm straight needles or size needed to obtain gauge.
4. Buttons for eyes
5. Stitch marker
6. Stitch holder
7. Yarn needle
8. polyester stuffing
Gauge: 2 inch = 13 stitches, 19 rows
Colours for Miffy:
MC - White
CC1 - Orange
CC2 - Yellow
Knitterbees stitch dictionary:
CC: contrasting color (CC1= contrasting color 1 etc.)
dpns: double pointed needles
k: knit
k2tog: knit the next two stitches together.
kfb: knit front and back
MC: main color
p: purl
pm: place marker
rm: remove marker
ssk: slip next 2 sts knitwise onto your right needle, insert left needle purlwise into the front of the sts & knit them together.
St st: stockinette/stocking stitch. k a row, purl a row. (In the round however you must knit every round.)
st(s): stitch(es)
yo: yarn over
Let's Begin Knitting !!!!!!
Head:
With the circular needle cast on 24 stitches (MC). Join to work in the round, being careful not to twist the stitches. Place a stitch marker on the first stitch. Work onto double‐pointed needles when necessary.
Row 1: knit
Row 2: (k2,kfb) Repeat to the end of the round. 32st
Row 3: knit
Row 4: (k3,kfb) Repeat to the end of the round. 40st
Row 5-6: knit
Row 7: (k4,kfb) Repeat to the end of the round. 48st
Row 8-9: knit
Row 10: (k5,kfb) Repeat to the end of the round. 56st
Row 11-12: knit
Row 13: (k6,kfb) Repeat to the end of the round. 64st
Row 14-21: knit
Row 22: (k6,k2tog) Repeat to the end of the round. 56st
Row 23-24: knit
Row 25: (k5,k2tog) Repeat to the end of the round. 48st
Row 26-27: knit
Row 28: (k4,k2tog) Repeat to the end of the round. 40st
Row 29: knit
Row 30: (k3,k2tog) Repeat to the end of the round. 32st
Begin dividing for ears
Using MC, knit the first 8 sts, CO4 sts as the inside edge of the first ear. Place the next 16 stitches on a stitch holder. Knit the last 8 sts. Join to knit in the round. Stuff the head before beginning knitting. Pm.
Row 32-50: knit
Row 51: (k3,k2tog) Repeat to the end of the round.
Row 52: (k2,k2tog) Repeat to the end of the round. Start inserting stuffing before hole gets too small.
Row 53: (k1,k2tog) Repeat to the end of the round.
Row 54: (k2tog) Repeat to the end of the round.
Use tweezers to stuff stuffing but don’t stuff too firmly. Break yarn and thread tail through remaining stitches, pull to inside of ear and weave in end.
Reattached MC from stitch holder and knit 16. Pickup and knit 4 sts from cast on edge of inside ear. Pm, join to knit in the round. Follow the same directions as for the first ear.
Body:
With the circular needle cast on 24 stitches (MC). Join to work in the round, being careful not to twist the stitches. Place a stitch marker on the first stitch. Work onto double‐pointed needles when necessary.
Row 1: (k2,kfb) Repeat to the end of the round. 32st
Row 2-3: knit
Row 4: (k3,kfb) Repeat to the end of the round. 40st
Row 5-6: knit
Row 7: (k4,kfb) Repeat to the end of the round. 48st
Row 8-10: knit
Row 11: (k5,kfb) Repeat to the end of the round. 56st
Row 12-14: knit
Row 15: (k6,kfb) Repeat to the end of the round. 64st
Row 16-19: knit
Row 20: (k7,kfb) Repeat to the end of the round. 72st
Row 21: knit
Row 22: (k7,k2tog) Repeat to the end of the round. 64st
Row 23: knit
Row 24: (k6,k2tog) Repeat to the end of the round. 64st
Row 25: knit
Row 26: (k5,k2tog) Repeat to the end of the round. 64st
Row 27: knit
Row 28: (k5,k2tog) Repeat to the end of the round. 64st
Row 29: knit
Begin dividing for legs
Using MC, knit the first 12 sts, CO8 sts as the inside edge of the first leg. Place the next 24 stitches on a stitch holder. Knit the last 12 sts. Join to knit in the round. Stuff the body before beginning knitting. Pm.
Row 31-44: knit
Row 45: (k2tog, k2) Repeat to the end of the round. Start inserting stuffing before hole gets too small.
Row 46: (k2tog, k1) Repeat to the end of the round.
Use tweezers to stuff stuffing firmly. Break yarn and thread tail through remaining stitches, pull to inside of leg and weave in end.
Reattached MC from stitch holder and knit 24. Pickup and knit 8 sts from cast on edge of inside leg. Pm, join to knit in the round. Follow the same direction as for the first leg.
Arms:
With the circular needle cast on 5 stitches (MC). Join to work in the round, being careful not to twist the stitches. Place a stitch marker on the first stitch. Work onto double‐pointed needles when necessary.
Row 1: (kfb) Repeat to the end of the round. 10st
Row 2: (kfb, k1) Repeat to the end of the round. 15st
Row 3-8: knit
Row 9: (kfb, k14) Repeat to the end of the round. 18st
Row 10-21: knit . Start inserting stuffing before hole gets too small.
Row 22: (k2tog, k1) Repeat to the end of the round. 12st
Row 23: (k2tog) Repeat to the end of the round. 6st
Use tweezers to stuff stuffing firmly. Break yarn and thread tail through remaining stitches, pull to inside of hand and weave in end,
Follow the same directions for the first arm for the second arm.
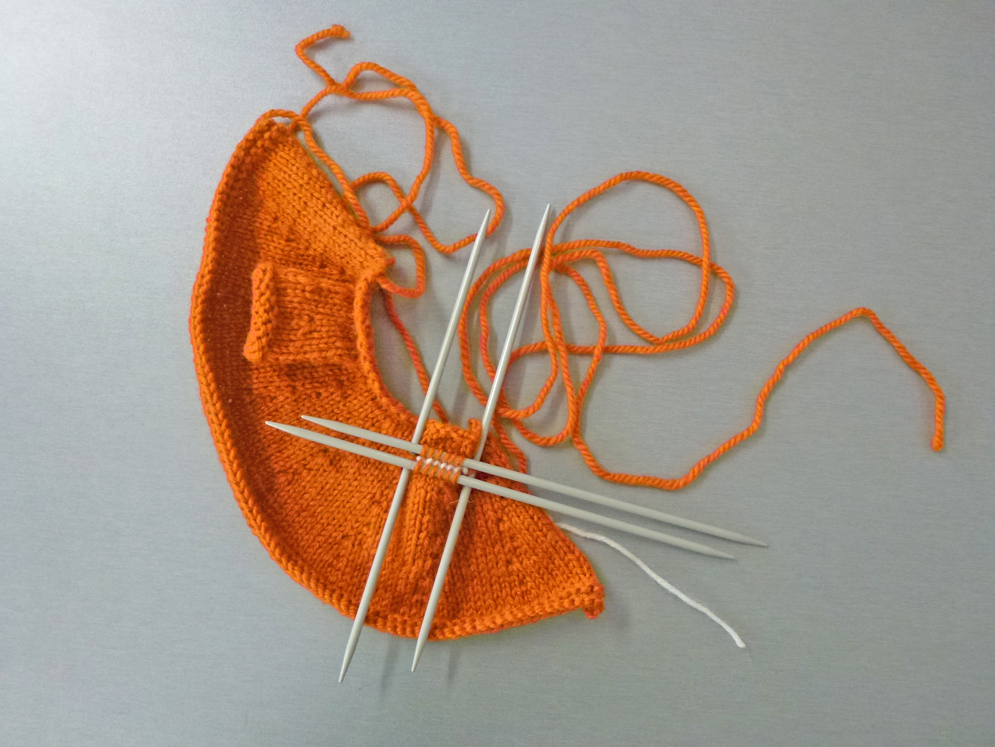
Dress:
With the 3.75mm straight needle cast on 24 stitches (CC1).
Row 1: (kfb, k2) Repeat to the end of the round. 32st
Row 2: purl
Row 3: knit
Row 4: (p3,pfb) Repeat to the end of the round. 40st
Row 5: k7, k6 in waste yarn, put back to left needle and reknit the 6 yarn, k14, k6 in waste yarn, put back to left needle and reknit the 6 yarn, k7
Row 6: purl
Row 7: knit
Row 8: (p4,pfb) Repeat to the end of the round. 48st
Row 9: knit
Row 10: purl
Row 11: (kfb, k5) Repeat to the end of the round. 56st
Row 12: purl
Row 13: knit
Row 14: (p6,pfb) Repeat to the end of the round. 64st
Row 15: knit
Row 16: purl
Row 17: (kfb, k7) Repeat to the end of the round. 72st
Row 18: purl
Row 19: knit
Row 20: (p8,pfb) Repeat to the end of the round. 64st
Row 21: knit
Row 22: purl
Row 23: knit
Row 24: purl
Row 25: knit
Row 26: purl
Row 27: knit
Row 28: knit
Row 29: knit
bindoff
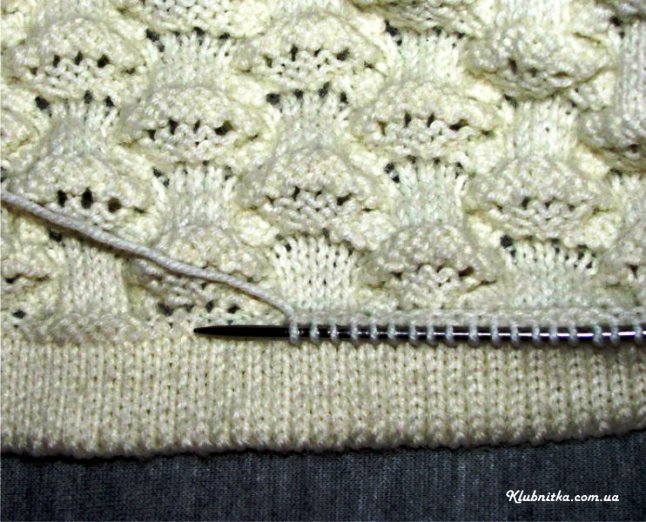
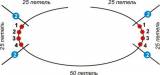
$IMAGE3$
k6 in waste yarn, put back to left needle and reknit the 6 yarn, k14, k6 in waste yarn, put back to left needle and reknit the 6 yarn
Sleeves:
With the 3.75mm straight needle pick up the top 6 stitches with one dpn and bottom 6 stitches with one dpn of the wasted yarn. Pick up the 2 stitches between the top and bottom stitch of each side with a dpn each. Remove the waste yarn and join to knit the round
Row 1-6: purl
Row 7: (p4,pfb) twice, p3, pfb
Row 8-12: purl
Row 13-14: knit
Bind off
Follow the same directions for the first sleeve for the second sleeve.

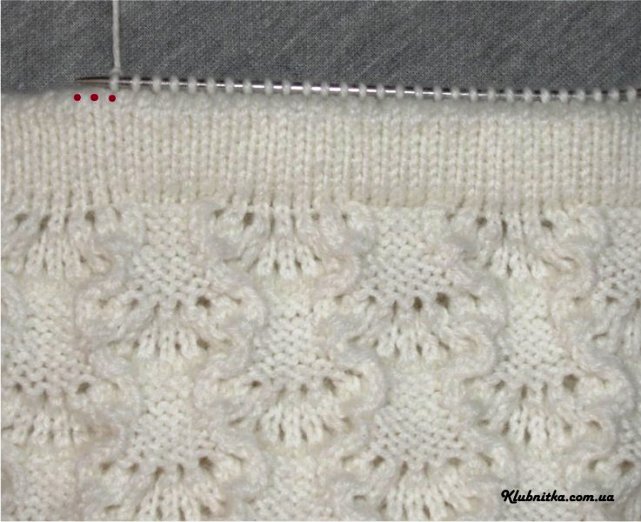
pick up 6 top and bottom stitches of the waste yarn and 1 stitches between the gap.
$IMAGE5$
remove waste yarn to create the hole for sleeve.
Balloon:
With the circular needle cast on 6 stitches (CC2). Join to work in the round, being careful not to twist the stitches. Place a stitch marker on the first stitch. Work onto double‐pointed needles when necessary.
Row 1: (kfb) Repeat to the end of the round.
Row 2: knit and all even numbered rounds: knit
Row 3: (kfb, k1) Repeat to the end of the round.
Row 5: (kfb, k2) Repeat to the end of the round.
Row 7: (kfb, k3) Repeat to the end of the round.
Row 9: (kfb, k4) Repeat to the end of the round.
Row 11: (kfb, k5) Repeat to the end of the round.
Row 13: (kfb, k6) Repeat to the end of the round.
Row 15: (kfb, k7) Repeat to the end of the round.
Row 16-22: knit
Row 23: (k2tog, k7) Repeat to the end of the round.
Row 24-25: knit
Row 26: (k2tog, k6) Repeat to the end of the round.
Row 27-29: knit
Row 30: (k2tog, k5) Repeat to the end of the round.
Row 31-32: knit
Row 33: (k2tog, k4) Repeat to the end of the round.
Row 34-35: knit
Row 36: (k2tog, k3) Repeat to the end of the round.
Row 37-39-: knit. Start inserting stuffing before hole gets too small.
Row 40: (k2tog, k2) Repeat to the end of the round.
Row 41-42: knit
Row 43: (k2tog, k1) Repeat to the end of the round.
Row 44: (k2tog) Repeat to the end of the round.
Use tweezers to stuff stuffing firmly. Break yarn and thread tail through remaining stitches, pull to inside of balloon and weave in end,
And PLEASE PLEASE PLEASE post pictures to my Ravelry account if you make this little guys!!
Killerbees
http://knitterbees.blogspot.com/search/label/free%20pattern
Majesty
|
| |
| |
| Majesty | Дата: Суббота, 15.12.2012, 09:01 | Сообщение # 3 |
|
Королева
Группа: Пользователи
Сообщений: 564
Статус: Offline
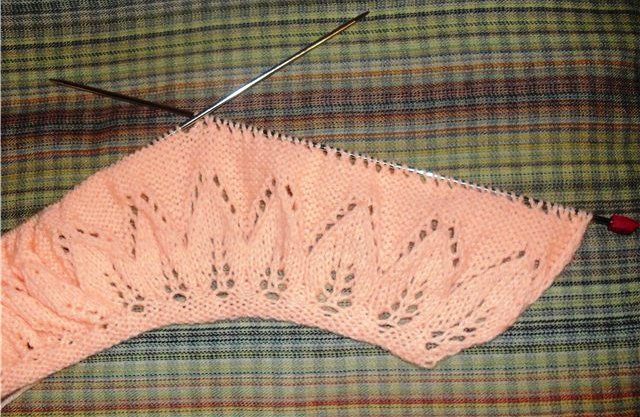
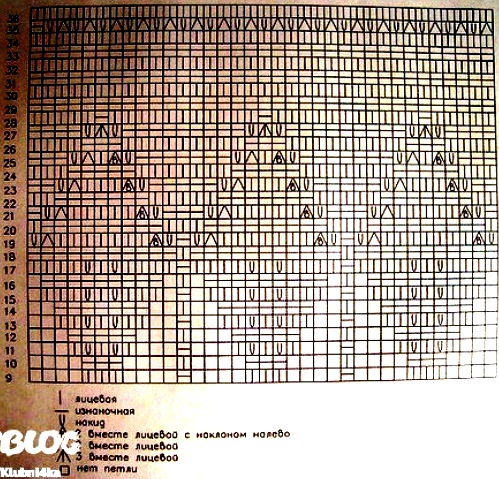
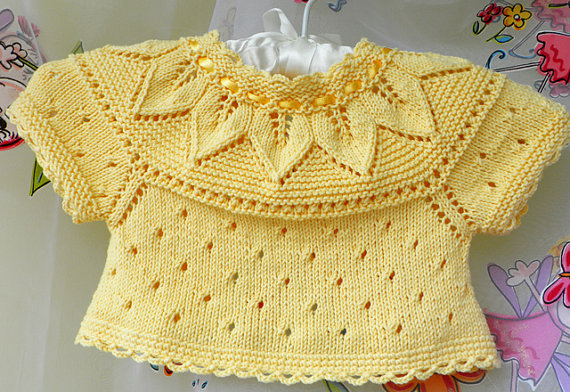
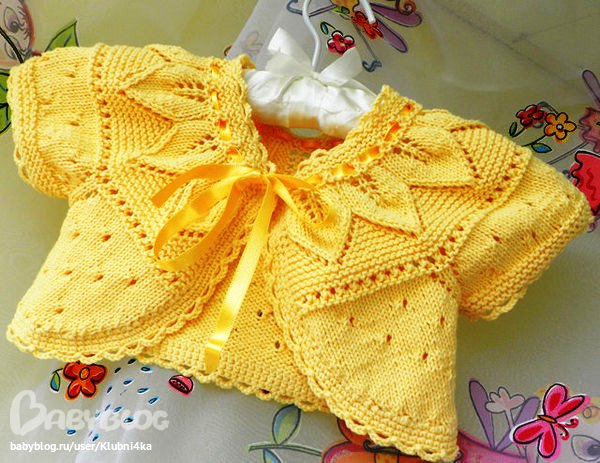
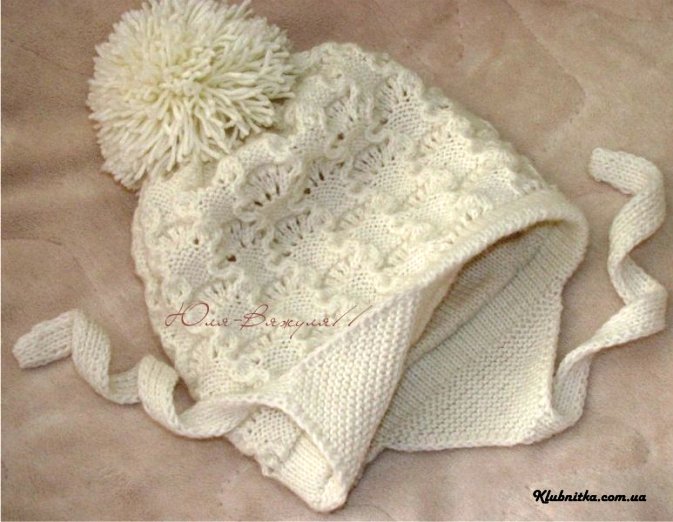
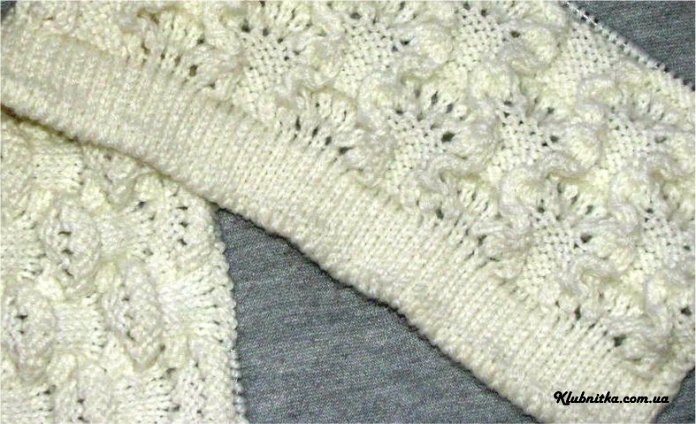
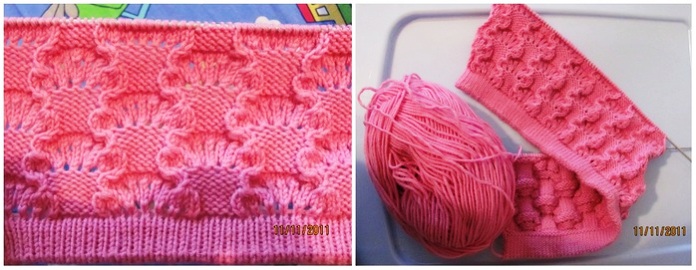
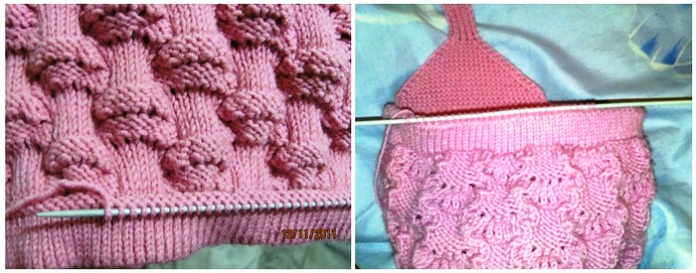
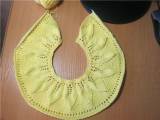
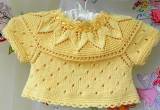
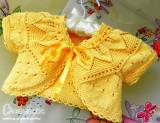
| Детский жакетик-болеро с красивой кокеткой
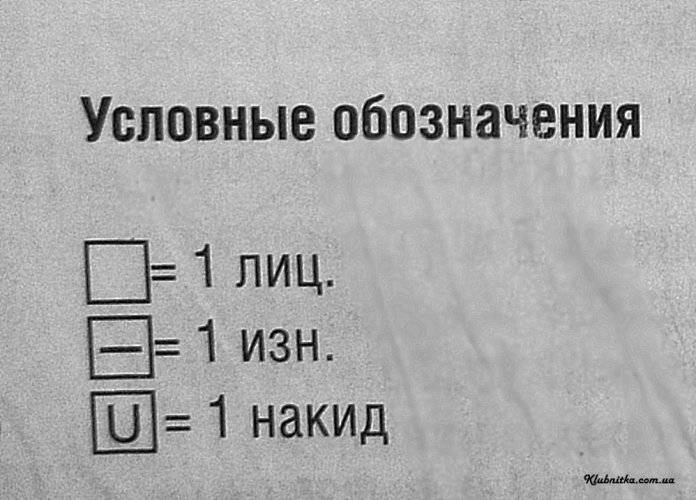
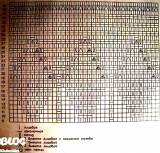
1 ряд- набрать 53 петли. 2,4,6,8 ряд- лицевые. 3,5 ряд -изнаночные далее по схеме
А дальше петли делятся на 4 равные части ( 1 часть- 2 полочки (т. е. 1 часть делиться еще пополам), 2ч- правый рукав, 3ч - спинка, 4ч - левый рукав), но вяжется пока все вместе. 34р- лицевые, 35р- 1ч петель минус 1 петля лицевые 1 накид 2 лиц 1 нак 2ч петель минус 2 петли лиц 1 нак 2 лиц 1 нак 3ч петель минус 2 петли лиц 1 нак 2 лиц 1 нак 4ч петель минус 1 петля лиц. 36р - изнаночные и тд до необходимой ширины спинки, потом все части вяжутся отдельно (я разделила в 45 ряду, и в 45 начала закругление полочек, закрывая по 1 петле в каждом нечетном ряду 9 раз, 1 раз 2 петли, 3 раз 3 петли, в следующем ряду закрыла все петли)
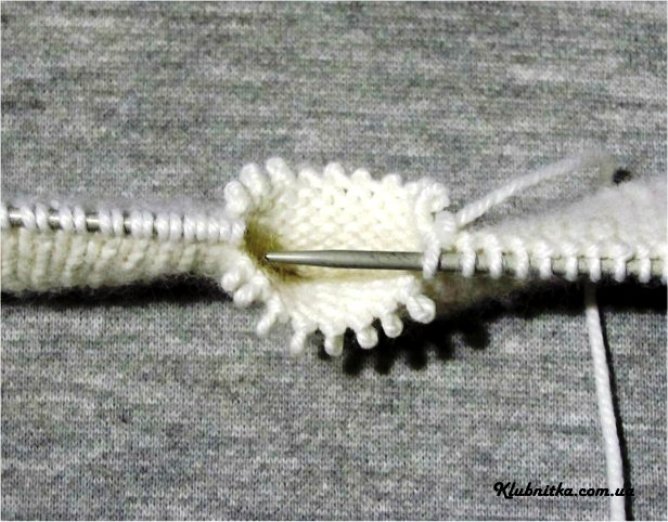
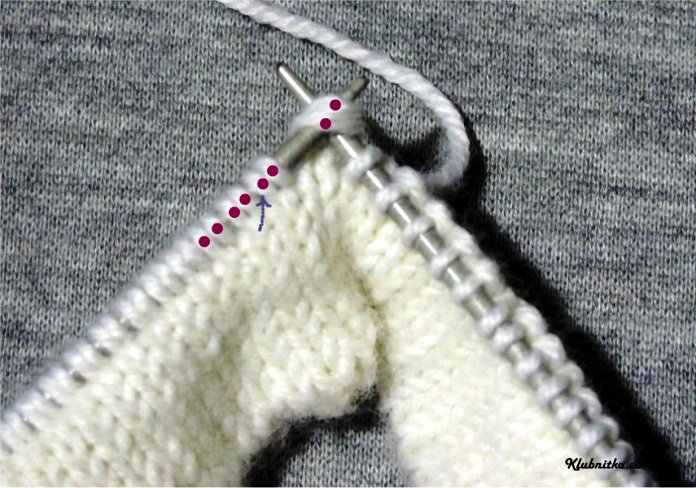
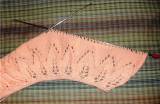
Сначала набираете необходимое кол-во петель и вяжете лицевыми петлями по лицу и изнанке 2 см., затем по всем петлям провязываете две вместе лиц, накид, и еще один ряд (по изнанке) лиц. петли. Теперь начинаем вязать кокетку.
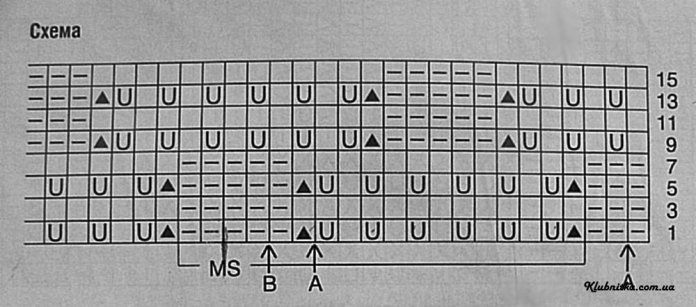
Я для пробы взяла на толстых нитках, других не было (260м в 100 гр) и у меня получилось 10 листиков, в идеале 12. Четные ряды вяжут изн.
1 ряд - 1 кромочная, 2 лиц.,накид, 1 лиц.,накид, 2 лиц., 1 изн..... в конце ряда 2 лиц.(изн., завершающую раппорт не вяжут), 1 кромочная.
3 ряд - 1 кромочная, 3 лиц.,накид, 1 лиц.,накид, 3 лиц., 1 изн..... в конце ряда 3 лиц., 1 кромочная.
5 ряд - 1 кромочная, 4 лиц.,накид, 1 лиц.,накид, 4 лиц., 1 изн..... в конце ряда 4 лиц., 1 кромочная.
7 ряд - 1 кромочная,5 лиц.,накид, 1 лиц.,накид, 5 лиц., 1 изн..... в конце ряда 5 лиц., 1 кромочная.
9 ряд - 1 кромочная, накид, 2 вместе лиц.,9 лиц, 2 вместе лиц., накид, 1 изн.....в конце ряда накид, 1 кромочная.
10 ряд и все последующие ряды- изнаночные петли и накиды из 9 ряда провязываем лиц., все остальные изн. петли
11 ряд - 1 кромочная, накид, 2 вместе лиц.,7 лиц, 2 вместе лиц., накид, 3 изн.....в конце ряда накид, 1 кромочная
13 ряд - 1 кромочная, накид, 2 вместе лиц.,5 лиц, 2 вместе лиц., накид, 5 изн.....в конце ряда накид, 1 кромочная
15 ряд - 1 кромочная, накид, 2 вместе лиц.,3 лиц, 2 вместе лиц., накид, 7 изн.....в конце ряда накид, 1 кромочная
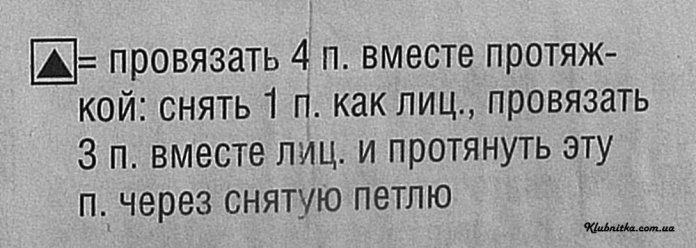
17 ряд - 1 кромочная, накид, 3 вместе лиц., накид, 9 изн.....в конце ряда накид, 1 кромочная.
Затем провязываем лиц. петлями рядов 6-8.
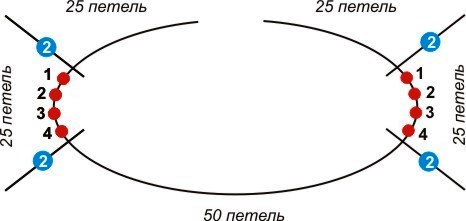
Теперь распределяем петли, на регланную линию идет две петли, всего у нас четаре регланных линий, значит 2х4=8 петель. От общего кол-ва петель отнимаем 2 кромочные и 8 регланных петель, оставщееся петли делим на 3 ( перед, два рукава, спинка) Допустим у нас 142 петли.
142-2-8=132
132/ 3 = 44
Значит на полочках будет 22 петли (44/2) + кромочная
На рукава тоже 22 петли (44/2)
На спинку 44 петли
Получится так 1 кромочная, 22 петли правая полочка, 2 петли регланной линии, 22 петли правого рукава, 2 петли регланной линии, 44 петли спинки, 2 петли регланной линии, 22 петли левого рукава, 2 петли регланной линии, 22 петли левой полочки, 1 кромочная - всего 142 и вяжете добавляя в каждом лиц. ряду по одному накиду с каждой стороны от регланной линии. Вот и все.
Там кое что подгоняла под себя, где догадывалась как дальше, главное смысл понятен
Ну а дальше элементарно, рукава я не довязывала, просто обвязала крючком и все, спинку и полочки вязала вместе, узор соображала так: 5 лиц.пет., накид, две петли вместе и т.д... изн.р. изнаночными, след. ряд подгоняла чтобы дырочки смотрелись в шахматном порядке, потом все обвязала столбиками б/н в 3 ряда и возд. петлями.... ну как то так..
|
| |
| | | |
| |